10. HTML ကို ေလ့လာျခင္း
ယခုဆက္လက္ ေလ့လာရမွာကေတာ့ Document မ်ားကို Format ျပဳလုပ္ႏိုင္တဲ့ HTML tag မ်ား ျဖစ္ပါတယ္။ ဒီလို Web page မ်ားကို သင္ႏွစ္သက္သလို ဒီဇိုင္းျပဳလုပ္ရန္အတြက္ေၾကာင့္ ဒီ Element မ်ားကို ကၽြမ္းက်င္ေအာင္ က်က္မွတ္ထားရမွာ ျဖစ္ပါတယ္။
<p align=?>
ဒါကေတာ့ စာပိုဒ္တစ္ခုကို ေရးသားရာမွာ ဘယ္အညီ၊ ညာအညီ၊ အလယ္အညီ အစရွိတဲ့ Alignment ကို ခ်ိန္ညွိလိုတဲ့အခါမ်ိဳးမွာ အသံုးျပဳရမွာ ျဖစ္ပါတယ္။ ဥပမာ စာပိုဒ္ကို အလည္မွာရွိေစခ်င္တယ္ဆိုရင္ေတာ့
<p align=''center''> ဆိုၿပီးေရးသား ေဖာ္ျပရမွာ ျဖစ္ပါတယ္။
<p align="right">This is right aligned.</p> ဒါကေတာ့ စာပိုဒ္ေတြကို ညာဖက္အညီ ညွိယူတာပါ။
<p align="justify">This is jutified.</p> ဒါကေတာ့ စာပိုဒ္ေတြကို ဘယ္ညာအညီ ညွိယူတာပါ။
<p align="left">This is left aligned.</p> ဒါကေတာ့ စာပိုဒ္ေတြကို ဘယ္ဖက္အညီ ညွိယူတာပါ။
<p align=''center''> This is center.</p> ဒါကေတာ့ စာသားကို အလယ္အညီထားတဲ့ Center Align ျဖစ္ပါတယ္။
ေအာက္ေဖာ္ျပပါ Tutorial ေလးကို စမ္းသပ္လုပ္ၾကည့္ပါ။
<html>
<title> My Web Page </title>
<head><h2> Web Development Lesson</h2> </head>
<body>
<p align="left"> <h4>Learning br Element </h4></p><br>
<p align="justify">
Note: The br element has a space between the characters br and the forward slash. If you omit this space, older browsers will have trouble rendering
the line break, while if you miss the forward slash character and just use br it is not valid XHTML</p>
<br>
</body></html>
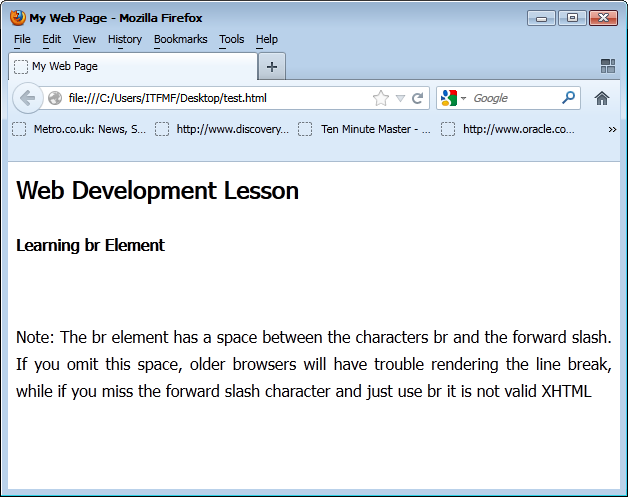
ဒီ Tutorial ေလးကို Browser မွာ ယခုလို ေတြ႕ရပါလိမ့္မယ္။ Align ကို Justify လုပ္ထားတဲ့အတြက္ေၾကာင့္ စာသားမ်ားကို ဘယ္ညာ အညီညွိေပးထားတာကို ေတြ႕ရပါလိမ့္မယ္။Align ေတြကို ေရးသားရာမွာ သာမန္ <p align= > ဆိုၿပီး ေရးသားလို႕ရသလို <p style="text-align: justify;"> လို႕လည္း ေရးသားလို႕ရပါတယ္။ ႏွစ္သက္ရာ ပံုစံျဖင့္ေရးသားပါ။

